Showing posts with label BYOB. Show all posts

Monday, July 6, 2015

Copy Cat Version of Dave's Killer Bread Good Seed.


Well, I just felt compelled to share this recipe! I absolutely love Dave's Killer Bread. I mean, who doesn't right? Good Seed is my choice and so I set out to make my own version at home. I just need to do a side by side taste test but you guys can tell me what I should change instead.  That is short of the sprouted grain flour because I just don't feel like make it (or buying it!). I did however sub 1 cup emmer grain flour and 1 cup bread flour because I was short on whole wheat flour. Let me know how your version goes! Here's the recipe with a little help from the bread machine as a time saver for me.

1 ¼ cups warm water
2 Tbsp white sugar
2 Tbsp brown sugar
2 Tbsp molasses
1 egg beaten

3 Cups Whole Wheat
¼ cup quinoa
¼ cup or more sesame seeds
¼ cup raw sunflower seeds
¼ cup flax meal
¼ cup whole flax seeds
¼ cup Irish Oatmeal (something hard)
¼ cup old fashioned oats
2-3 Tbsp cracked wheat
¼ cup packed full Vital Wheat Gluten
1 tsp salt
1 Tbsp instant yeast

Use bread machine on dough cycle. Pull out when finished and shape for loaf pan. Heat oven to 350. Let rise until size is suitable and bake for 25-35 minutes in a large loaf pan.

I really enjoyed the crumb. The egg gives it a bit of fluff, yet it isn't in Dave's bread, but I needed it. I also over fill all my seed cups and even dump extra in and then roll the bread in seeds before I drop it in the loaf pan for it's final rise. The wheat gluten really gives it some stretch and could maybe use more depending how much whole wheat you use.  And lastly if it doesn't cook long enough it will be kind of gummy inside. That's a tell tale sign to bake it longer next time. Still good to eat though! And really yes you do need the molasses. Happy Baking!!

Monday, March 25, 2013

100% Sprouted Grain Bread Recipe #1


First I sprouted the following grains: wheat, barley, millet & spelt. Once all sprouted and combined they looked like this:


 Next I used my my champion juicer with the blank screen in to grind it to a pulp and activate the gluten.

I mixed about 1 TBSP. malted barley and 1TBSP yeast in my kitchen aid mixer with a touch of warm water to bubble for about 5 minutes. Then added the ground sprout mixture and used the mixer to bring it together. I put it in an oiled bowl to rise covered with plastic for about 2 hours. It rose a little. See note about skipping this rising step next time.

After the 2 hours I folded it over itself 2 times and rolled into a semi log shape gently and pressed it into the oil bread pan. Please not that this was a mistake. It should have gone directly into the loaf pans to rise and then bake.

 I baked it at 350 degrees for 40 minutes and this was not enough! I put it back in the oven at 275 degrees for 2 hours. This is how it looked before I put it back in for the second round of baking.
So it cooked up well, it was just a very dense little brick. I had to let it set up in the fridge for 2 days to get make it edible, otherwise it was too wet and gummy inside. I figured once I'm using wheat berries I might as well add some whole wheat flour next time and vital wheat gluten too. I don't like brick bread although it tasted delicious!

Tuesday, May 31, 2011

sourdough introduction - pizza dough & garlic knots

My sourdough experience began about 6 weeks ago with some failed starter. Now that I have a good starter, Carl's 1847 Oregon Trail starter (click to find out how to get some of your own free starter), and have aged it a bit I decided to try a couple recipes. Started out with some flapjacks and biscuits. The biscuits were terrible little bricks but the flapjacks were great and we could taste the sourness and it was amazingly delicious!!! I had never eaten flapjacks before so it really confused me when they came out so thin! I thought I did something wrong but my hubby said they were perfect. So yah!

Next I made pizza dough and garlic knots. The pizza dough came out too crispy, I think I won't par bake it next time. The garlic knots were amazing, soft and light yet crispy and buttery. I must say that there is A LOT of butter in the recipe and I really can't make these too often. Here is the recipe as they looked looked about the same: Sourdough Pizza Dough
Park Baked Sourdough Pizza

 I think my pizza might have been a little less crispy buttery fried if I had not par baked it, although it was great the night of I prefer a soft crust. Not doughy but not crispy either. I will try this recipe again with out the pre-baking and I'm sure it will be perfect.  We always eat the end result so fast I forget to take pictures. I tend to make the same style each time - Mediteranean. You can put all or some of the following toppings: pesto sauce, cheese, sun dried tomato, mushroom, olives, feta, and artichoke. I also added fake pepperoni last time just for fun. 


Great to Par Bake if you plan on freezing though!


Now the Garlic Knots (modeled after The Great American Pizza company's "doughnots") were AMAZING! At least for my first try I was pretty happy. I basically just used the pizza dough recipe but kept adding flour until I had a dough ball I could work with and knead because the pizza dough was really wet, and I added Vital Wheat Gluten to the pizza dough which I didn't add to this batch. Here is recipe I kinda looked at over my should while trying to "wing" my knots. http://www.foodmayhem.com/2009/08/garlic-knots.html These are also WAY more delicious than these rolls that I made here, they ended up way too dry and I haven't gone back to make them again but not so dry. Soon but I'm enjoying playing around with my sourdough starter.

Also just a quick note that when I made these, I then melted the butter and poured it all over the top while it sat in a foil bowl that I then closed up tight and put in the oven again on a low setting just to sizzle in the butter. Yum yum butter.

Monday, May 23, 2011

Challah Challah!!

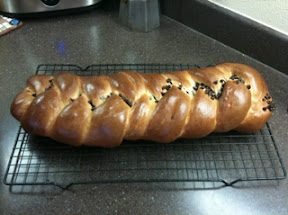
I <3 <3 <3 Challah! So I thought it time to share my recipe. ;) This recipe makes the equivalent of 3 small braided loaves or 2 larger braided loaves. I like splitting it into 2 loaves and braiding it as suggested and then putting it into a bread pan for nice slice-able bread (and even better for french toast!! yummie) Also I make one a chocolate challah and the other a plain. Pictured above is my most recent chocolate challah. Each of the ropes where rolled out with the rolling pin and filled with chocolate chips (or nutella) and then rolled up lengthwise and then as I braided it I put more chocolate chips in. End result was not enough chocolate! I want it like Hadassah's famous chocolate challah at the Marin JCC ECE! It was layer's upon layer's of chocolate with bread in between. That's my kind of chocolate bread. As soon as I figure it out I will post more about it. :)


Challah Recipe

* 7 cups flour
* 1 T salt
* 1/2 cup sugar (or honey)
* 2 pkg yeast + 1/3 cup warm water
* 1/2 cup oil
* 4 eggs
* 1 cup boiling water
* 1/2 cup cold water

------------------------------------------------------------------------
Beat eggs in a small bowl.

In a large bowl mix oil, sugar and salt.

Add boiling water to large bowl and stir until all is dissolved.

Sprinkle yeast into a measuring cup with 1/3 cup warm water. Wait a few minutes, then stir.
Add cold water to mixture in large bowl. (The stuff in the bowl should now be the right temperature to add yeast. If too hot, wait a few minutes; if too cold, put the bowl in the microwave to heat it.)
Add yeast to large bowl.
Add eggs to large bowl, reserving about 1 tablespoon.
Add flour 1 cup at a time, mixing thoroughly after each addition.
Turn out dough onto floured board and knead for 5 minutes, adding more flour as needed (but not too much). Dough is ready if it springs back after being poked with a finger.
Put back into bowl, cover with dishtowel, and put in warm oven (heated to 170-200, and then turned off beforehand) until doubled - about 1 hour.
Turn out onto floured board and knead for 1-2 minutes.
Divide dough into thirds.
Take one of the thirds, and knead for another minute. Form into 8-12 small "snakes" for bulkies, or 3 large snakes for braid. Make bulkies by knotting each small snake and pinching the ends together. Place bulkies close together pinched-end down in greased pan (I use a silicon mat covered baking sheet or a oil greased bread pan). For braids, pinch ends of 3 large snakes together and begin braiding. Pinch ends together when done. Place in greased loaf pan.

Repeat for 2 other thirds. Put formed loaves/bulkies into oven (pre-heated and then turned off, as before) for about 45 minutes.
Remove from oven. Turn oven to 350.
Brush tops gently with reserved egg. Sprinkle with poppy seeds, if desired.
Bake for about 30 minutes (loaves) or 20 minutes (bulkies). Times will vary. Watch for moderate browning on top, but be careful not to allow scorching on bottom.

Thursday, March 31, 2011

even more perfect wonderful whole wheat fluffy sandwich loaf

I really didn't think my bread could get any more perfect than it already was but low and behold these beauties are amazing!

Can you see how light and fluffy! It is so soft and delicious and sweet and oh so perfect. What did I change you ask? Well I ran out of oats. Never thought the oats where drying the bread out so much but hey, each trial teaches you something new! So I replaced the 1 cup oats with a 1/2-2/3 cup unbleached white flour. I also finally bought honey! So 1/4 cup honey and still kept the 2Tbsps of white sugar to give it that sweet yummie bread flavor I was looking for. Then I also painted the tops with honey before baking. Now I could have gone without that because my hands are so sticky from each time I hold the bread to cut it. I also keep it wrapped up in plastic which makes it a little stickier! (haha!) So here is the orignal recipe. And here the new one with adjustments made for this round! ROUND 6!

Yield: 2 loaves
Ingredients:

2 tablespoons active dry yeast

2 cup warm water (110-115 degrees F)

2 tablespoons milk 2 tablespoons oil

4 tablespoons or 1/4 cup honey

2 Tbsp White Sugar

4 tablespoons brown sugar

2 teaspoons salt

2 tablespoons Vital Wheat Gluten (Bob's Red Mill is what I used)

2.5 cups all-purpose flour

3 cups whole wheat flour

Instructions:

1. Combine first 2 ingredients with a pinch of sugar and let proof for 5 minutes. I did this in the measuring cup so that I could put the next 4 ingredients in a large mixing bowl and stir while waiting for the proof. Once bubbly and fluffy add the yeast mix to the mixing bowl and stir.


2. Add flours, vital wheat gluten and salt and knead until dough is smooth and elastic, about 5 minutes. I do this in my kitehenaid mixer. Place dough in a greased bowl, turning once to grease top. Cover with a clean towel and let rise until doubled, about 40 minutes to 1.5 hours.


3. Punch dough down; knead for a few minutes until smooth and then form into two loaves. Place in 2 greased loaf pans and cover. Let rise in a warm place until it is the size you would like your loaf to be once baked. It will not rise in the oven, maybe a little, so don't put it in the oven until you like how it looks. I painted the top with warm honey and then you can sprinkle all kinds of oats or seeds or anything on top that would like to make it pretty. I left everything off because then I have to sweep the floor even more often.


4. Bake at 350 degrees for 30-35 minutes. If loaf starts browning too soon cover it with some foil. My loaves were perfect after 30 minutes. Very soft and tend but almost hard and hollow when knocked on.


5. Remove bread from oven and allow to rest in pan for a few minutes. I removed it to a wire rack to cool. Slice and enjoy while still warm or wait until cooler so that your bread slices nicely! (click here for a little bread slicing tutorial) Leftover bread can be stored in an airtight bag or frozen until needed.

Monday, March 28, 2011

march breads

I know I mentioned this before but finding the time to blog about my baking is very difficult for me. This month I will just be posting everything I baked and a few I forgot to take pics of for the blog. I baked a little less this month over last month but still had a wonderful array of yummie yeasties and I even ventured into trying some wet breads and sourdough.

Here I made some Garlic Naan! It came out wonderful! So much so that I actually made it twice. The first week in March and the second week to go with a yummy vegetarian red curry.

I don't have a pizza stone so I put my cast iron flat iron in the oven and it came out brilliant! Here is the naan cooking away in the oven.


And here is the final product.

After reading the March round up from BYOB I was totally inspired to make the chocolate brioche that Roxanna made from Green Girl. I stayed traditional in shape but liked the idea of using Nutella inside instead of the chocolate chips and boy did this taste good. But bottom line - it was just like my chocolate challah bread. I need to do a little more reading about what makes Brioche a Brioche instead of just calling it an egg bread! I think I ate most of it!


So I picked up Healthy Bread in Five Minutes a Day and tried out the recipe for the fluffy sandwich bread on page 92. It was much better than the 10 grain cereal one tried in January but still wasn't not sold on it as a regular staple in my house. It was still really dense and the strong yeast smell made my husband not want to eat it. So it lasted a long time. But it was super delish toasted with butter and thinly sliced extra sharp cheddar cheese. My personal favorite is Tillamock's Vintage White Cheddar - extra sharp. I pick up the 2lb block every time I go to Costco as this is truly my favorite cheese. The hamburger buns were from the same batch of dough and they came out pretty good too but still hubby didn't like the smell.

As you can see it came out with quite a nice texture and was soft but not as soft as my favorite whole wheat bread that I keep making. You can see a few pics below or click here for the recipe.

Here is my next round of Bagels that really did not fair that well! I'm not sure what I am doing wrong but they come out so FLAT and this time they were all gooey in the middle where the water seeped in while boiling and didn't seem to cook off. I feel like my dough is too dry so as I shape the balls the top dough tears leaving places for the water to sneak in. I'd love some help here if anyone knows what to do or how to help me. I will be trying it again this week and will try to keep my dough a little more hydrated and hopefully more pliable. I need the gluten to do it's job so maybe I should knead it longer too. hmmm.....

Here I cut the yucky part out of the middle so that I could eat it. Ew! Didn't taste bad though. LOL!

Of course another round of chocolate chip banana bread. And muffins too but they didn't have any chocolate. That way I can send it for snack to school with Mr. H.

Round 5 of favorite whole wheat oat bread. Here's the recipe. I really feel like it just gets better every time.

So I ventured into the realm of sourdough bread. I think this one needs it's own post which will come later but bottom line is it came out more like a french loaf because my sourdough starter was bad. Still tastes good though, hehe.

Sliced up nice too! I made it because I really wanted to have pannini's for dinner. I served this sandwiches with a really delicious broccoli cheddar soup (I adjusted it to be vegetarian). Here is the link for that recipe because it was amazing. I highly recommend doubling the recipe to serve 8 so that you have enough leftovers.


What I didn't get a chance to take pictures of were my beautiful Calzones! They were so pretty with the rolled twisted edges and the filling was to die for, adults got mediterraian style and the kiddo's got pizza pocket style. Yum yum. I baked them in the oven just like I did the naan above. I put my cast iron flat iron in the oven and baked it on one side only. Super duper great.

Lemon Poppyseed Muffins - small batch so they went super quick. Only two left and a picture with two muffins only is a sad picture.

Also put together a pan full of my no-bake eggless granola bars. Super quick and easy, here is the recipe:
1 cup chopped pecans
1 cup chopped cashews
1 cup coconut flakes - dry unsweetened - I love this so sometimes I add extra, yum yum!
1 cup oats
1 cup puffed rice cereal
1 cup kamut puffed cereal
1/4 cup flax meal
Put all in a 9x11 pan and toast @ 350 degrees in the oven for 12 minutes, stirring every 4 minutes so they don't burn. While that is toasting heat 3/4 cup honey and 7 Tbsp coconut oil on the stove till warm and mixed. Combine the honey and dry toast ingredients and then press into the 9x11 pan. Let cool. Place in the fridge to get extra hard. Pull out, flip over onto a cutting board and make your granola bars! Too much honey and they are too gooey and fall apart when not super cold from the fridge. Still really good but almost too sweet when there is too much honey. I wrap each individually and keep in the fridge for quick snack access. You can press chocolate chips into the top after pressing into the pan for chocolate coconut granola bars. My favorite!

Tuesday, March 1, 2011

Busy Monday

Yesterday was a busy day! Here's my 4th round oft favorite whole wheat bread recipe!


Also made our hamburger buns for our yummy eggplant burgers that I was making for dinner. Talk about kids loving veggies! This was a hit, a definite one for the books. The hamburger buns on the other hand didn't look perfect but tasted great. I topped some with onion and some with sesame.


And the bagels of course!

Monday, February 28, 2011

More Bagels

Loving the bagels. Think this might be a regular thing. Next time bigger batches and freeze some since these only last a week!

Wednesday, February 23, 2011

Bagel Time

This is my second time trying bagels this month. I'm not sure how good I am at it yet. Seems like the plain ones keep going flat and saucer like but the ones I put a topping on stayed puffy. Not sure why yet. All the recipes tell me to only let them rise for 20 minutes before I boil them but they are never risen enough yet so I leave them for 2 hours. Maybe that's why they are flat but if I don't wait that long I'd have little bagels. I'll keep working on this one. Not everything comes out perfect the first time (or second). So as you can see they rise just fine, this was about half way through the rise time.

Then they boiled up great too. The recipe I tried this time said a total of 7 minutes boiling, the last one said 3 minutes, I think it made them softer.

I put slug slime (some crazy mix of toppings from a bagel shop near Humboldt or Arcadia. I will have to find out again but Oma brought some over for us to use.

The plain ones look a little flat.....but the topped ones are perfect. Also the bottoms got a bit too crunchy on the plains, I even pulled them out a little early.

I had to bake them on the bottom racked because I had 2 quiches baking on the top rack so that might account for the crispier bottoms. It was 375 degrees for 30 minutes. They came out at 27 minutes.


Yum yum close up.

Slicing Bread & Round 3 Whole Wheat Bread

So here goes, this is how I've figured out to slice my whole wheat sandwich bread so it comes out just like store bought bread slices.

First have a decent bread knife, doesn't have to be amazing or expensive, it's all about your wrist! I do quick little slices back and forth, gently pressure, just like I'm an electric knife. I picture what those bread slicers do in the store and try do it with my knife on just one slice. I know I'm a dork. But I like to see things in my head, it's how my brain works. So just keep doing that till you reach the bottom and you did it!

Second you have to hold the slice upright so that it doesn't fall over and crack in half since this is really nice soft bread and you want it perfectly thin. Just like the picture above. Also the longer the loaf rises the fluffier it will be and the harder it is to slice and the more important it is for you to support the slice while cutting it.

Third, you can flip the bread over and slice it upside down. It squashes the top a little but it bounces back, just don't push too hard!


So this is my round 3 loaf, one of them, and as you can see they do come out different every time. So why does it look so different this time? Well hubbie helped out. I had to go to the store so he brushed the tops with half and half instead of milk and also they hadn't risen quite to where I wanted them when he put them in the oven. I also told him to leave off the oat sprinkle from the top because all it does is make a mess. Don't get me wrong, I think it looks pretty and all but this was just more practical.

So you can see the pretty bouncy muffin top is gone, it's a little denser too. It also did not "deflate" like the last couple batches. Not a bad thing but the other loaves you can see how wrinkled they were on top from the "deflating". I also like to wrap them up in plastic as they come out of the oven to maintain the moisture and so the crust gets soft because I personally dislike crunchy crust on my sandwich bread.

Saturday, February 19, 2011

Garlic Pull Apart Rolls


Garlic pull apart rolls came out delicious!!! Definitely making again. I froze a few too for dinner next week. Next time I'll freeze them before the second rise.


Also thinking of making extra garlic butter to brush the tops with next time.


Thursday, February 17, 2011

Wonderful Whole Wheat Bread - round 2

This is a follow up to my original post here for my favorite perfect whole wheat sandwich bread.


The dough will be stiff and feel dryer than a white bread dough - that's ok.


For the second rise I cover it with plastic wrap loosely that's been sprayed with oil because I have a cold kitchen. I also drape it with a towel and set it near the oven that is usually on.


Once completely risen to the height you would like your bread to be (it doesn't rise much in the oven) gently paint the tops with milk and sprinkle oats on it.


Oh I love the smell of the warm bread. We eat one right away and I freeze the other one as we tend to go through 2 loaves each week.


Ok so here's my tip of the day for getting perfect store bought slices out of your loaf! Turn it upside down and if you aren't using an electric knife (I don't have one) cut like you are using an electric knife. Also, if you like thin slices hold the slice up so it doesn't break in half. You'll see what I mean when you try it. Kinda hard to explain. I'll try get a picture next time.

Chocolate Cravings??? Well I had one for chocolate chip banana bread


Thanks Rachel Ray for having great recipes. Got this one from her website and it came out delicious! I added extra chocolate chips too. :0 Here's the recipe or click here for the link to her site: As you can see we were so excited to eat it I didn't get picture till we were almost half way through it!


Chocolate Chip Banana Bread
Ingredients
  • 1/4 cup vegetable oil
  • 1 1/2 cups flour
  • 1 cup sugar
  • 1 teaspoon baking soda
  • 1/2 teaspoon salt
  • 2 eggs, lightly beaten
  • 3 bananas, mashed (1 cup mashed banana)
  • 1 cup chocolate chips
Preparation

Pre-heat the oven to 350°F .

Grease and flour a 8 1/2-inch x 4 1/2-inch loaf pan (or use baking spray, such as Baker's Joy brand).

In a large bowl, whisk together the flour, salt, sugar, baking soda and salt. Mix in the oil, bananas and eggs. Stir in the chocolate chips (do not overmix!) and pour into the prepared pan. Bake until a toothpick inserted in the center comes out clean, about 70-80 minutes. Cool the loaf in the pan for 10 minutes, then turn out and cool completely, right side up.

Notes for next time: Double the recipe and freeze one loaf because we obviously eat it way too fast! I almost did and am not quite sure why I decided against it. Darn!

Wednesday, February 16, 2011

Quick Update for the week

So I'm having a terrible time finding time! How does everyone else do it? Taking pictures, posting recipes, links oh my gosh! I've take the pictures but just wanted to give a quick update with out pictures of what's been made in the last week.

Baked 2 more whole wheat bread's. I forgot to mention that I paint the top with milk and sprinkle oats just before I pop it in the oven.

Made a delicious pizza - actually 2! Ok so pics and recipe to come.....actually we ate the pizza so fast I didn't get a picture of the finished product, yikes! Just the dough. haha! next time. I make them every week so we have more chances still for this months round up.

Wish me luck. ;)